How to Set Up HTTPS for Free on a Dockerized Ruby on Rails Production Server
I recently launched a Ruby on Rails based application and wanted to add HTTPS to my domain. In this post, I'm going to show you how to add HTTPS to your domain using a tool called Certbot.
Why do you need HTTPS?
HTTPS is an essential service for modern web applications. An HTTPS-enabled website will encrypt all of the data sent between you and the website server. This protects your passwords and other sensitive information from third parties on the Internet such as other users on your local Wifi network. HTTPS can also be used as a means to help users identify that they are on a correct website and not a scam website doctored to look like an authentic website. With the major web browsers like Chrome now labeling non-HTTPS enabled websites as insecure, HTTPS may soon be a required feature for website delivery.


Prerequisites
This particular HTTPS setup is making several assumptions on your general website setup. In this case I had the following pieces of software already running and configured:
- Ubuntu Linux 18.04 (Bionic Beaver) - this won't work for Heroku or Windows.
- Application running on Docker
- Rails app already installed on the server via Capistrano and running via Docker
- NGINX installed on the server (but you can also run it via a Docker container)
- Certbot installed
What is NGINX?
NGINX is a Node.js based web server. In the Javascript world it can be used similarly to WEBRICK, Puma, or Thin of the Ruby world. You could whole Javacsript applications served by NGINX. It's also known for it's speed, which has similar performance benchmarks to Apache HTTP Server.
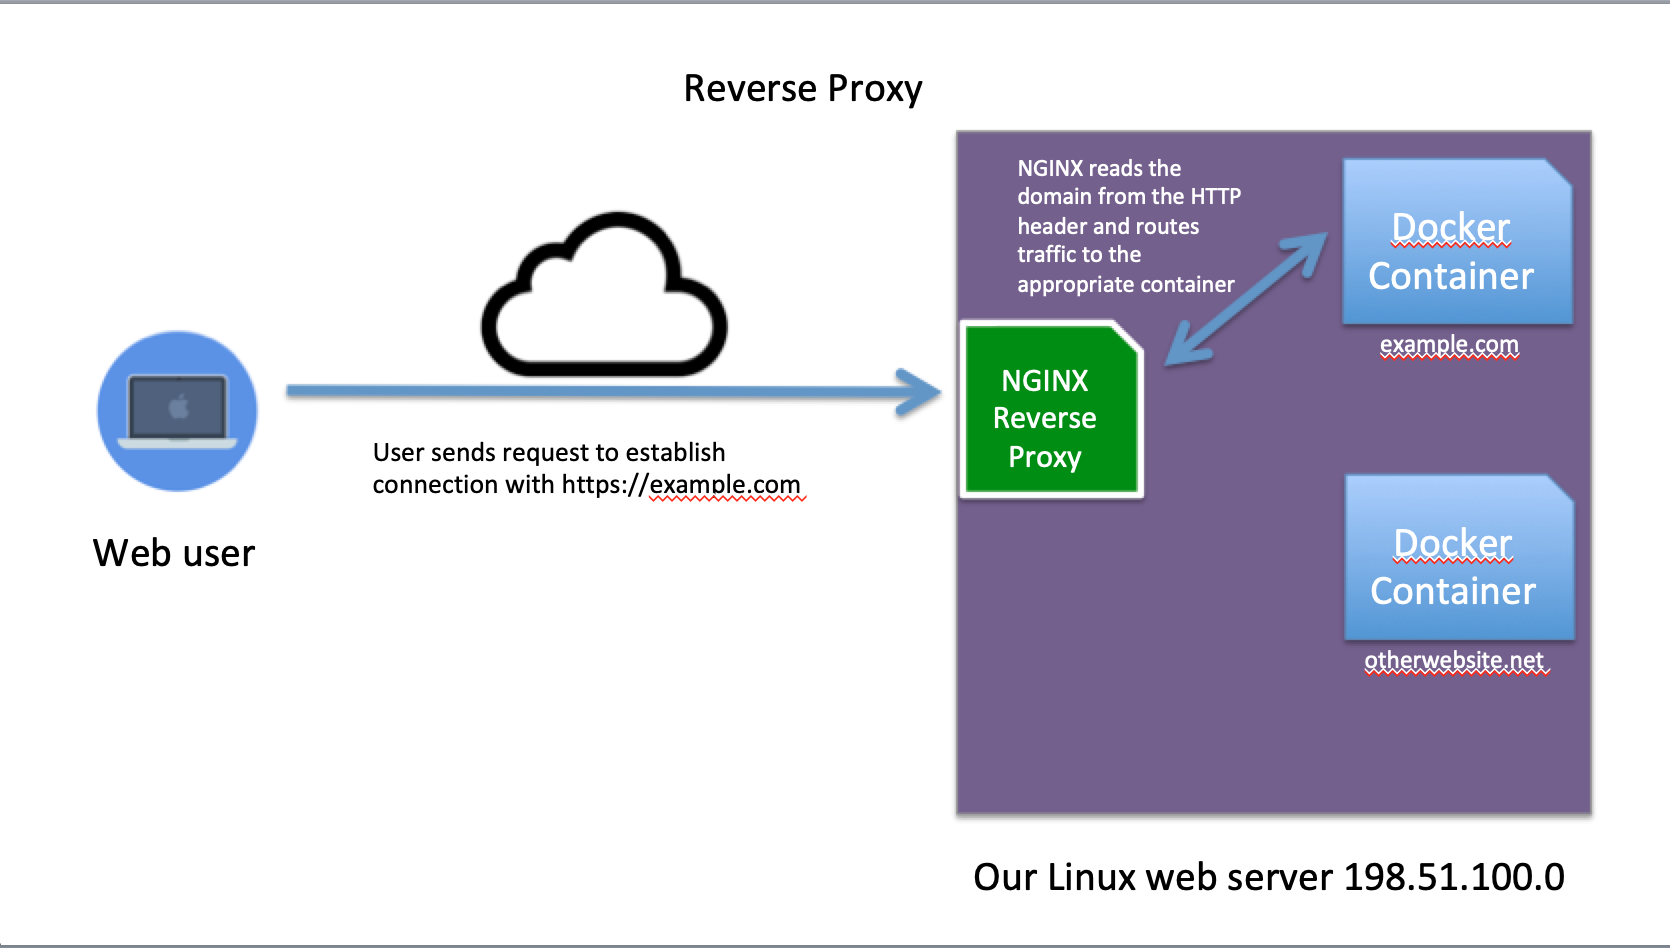
In this example NGINX serves three functions: 1) Integrate our HTTPS certificate into transport layer. 2) Redirect traffic seeking the HTTP port 80 to the HTTPS port 443 to force clients into using the more secure protocol. 3) Route web traffic to the appropriate container for the domain name of the request. This will allow us to serve multiple websites using the same Linux server.
This kind of setup for routing web traffic is called a reverse-proxy.
How do you install NGINX?
Installation instructions are found on the official NGINX website.
For this example instance, I installed NGINX using the apt-get repository:
$ sudo apt-get install nginx
Once it's installed, a useful command to run is the configuration test, which verifies the OK status of its configuration
settings.
$ sudo nginx -T
nginx: the configuration file /etc/nginx/nginx.conf syntax is ok
nginx: configuration file /etc/nginx/nginx.conf test is successful
What is Let's Encrypt and Certbot?
Let's Encrypt is a nonprofit organization that promises to be the Internet's free, automated, and open Certficate Authority (CA). Several companies such as Symantec, DigiCert, GoDaddy are also CA's and offer certificates for a fee. For HTTPS to work, your server needs to install a certificate from one of these companies, which is nothing more than a private encryption key associated with your domain. When a client connects to your website, your server will send a message encrypted with that private key, which can be decoded by a public key on the client's end. HTTPS enabled web browsers like Firefox or Chrome come with these public keys preinstalled, per an arrangement with the CA companies. If you want a more general overview of how HTTPS certificates work, here is a great YouTube video explaining the process.
Let's Encrypt has made the installation and renewal of SSL Certificates easy with a tool called Certbot. Certbot validates your server to the Let's Encrypt by having it perform what it calls an ACME challenge. An example would be when you run Certbot, it will make a temporary file available via HTTP which the Let's Encrypt organization can access. Let's Encrypt will then check the DNS records to verify that the domain name you want to certify points to the server you are running Certbot from. If the DNS matches, then Let's Encrypt will send a newly issued certificate to your Certbot.
Certbot Tnstallation
Installation instructions are available on the Certbot user guides, but here is a summary of the commands I used to install Certbot:
$ sudo apt-get update
$ sudo apt-get install software-properties-common
$ sudo add-apt-repository universe
$ sudo add-apt-repository ppa:certbot/certbot
$ sudo apt-get update
$ sudo apt-get install certbot python-certbot-nginx
Notice that I also installed the python-certbot-nginx module, which invokes our instance of NGINX in performing
the challenge.
Configure the DNS to Point to the Server's IP Address
All you need is an A or CNAME record pointing your domain to the IP address of your Linux server.
Run the Certbot ACME Challenge to Verify the Domain
sudo certbot --nginx -d my-example-domain.com -d www.my-example-domain.com
Passing the nginx flag tells Certbot to use NGINX to perform the ACME challenge. Certbot temporarily modifies the
NGINX settings so that the remote Let's Encrypt system can find a file on your system to complete the challenge.
Once complete, it will automatically install the received SSL certificate, which will act as a private key during the HTTPS initiation.
Update the NGINX settings to forward HTTP to HTTPS
Certbot should update your NGINX settings automatically, but here's now it will look after.
# /etc/nginx/sites-available/my-example-domain.com

server {
    root /var/www/my-example-domain.com/current/public; # Directly serves anything in the Rails public folder
    index index.html index.htm index.nginx-debian.html;
    server_name my-example-domain.com www.my-example-domain.com; # managed by Certbot

    location / {
        proxy_pass http://localhost:8030; # 8030 is the port the Docker container is running on
          proxy_set_header Host $host;
          #try_files $uri $uri/ =404;
    }

    listen [::]:443 ssl ipv6only=on; # managed by Certbot
    listen 443 ssl; # managed by Certbot
    ssl_certificate /etc/letsencrypt/live/my-example-domain.com/fullchain.pem; # managed by Certbot
    ssl_certificate_key /etc/letsencrypt/live/my-example-domain.com/privkey.pem; # managed by Certbot
    include /etc/letsencrypt/options-ssl-nginx.conf; # managed by Certbot
    ssl_dhparam /etc/letsencrypt/ssl-dhparams.pem; # managed by Certbot
}

server {
    if ($host = www.my-example-domain.com) {
        return 301 https://$host$request_uri;
    } # managed by Certbot


    if ($host = my-example-domain.com) {
        return 301 https://$host$request_uri;
    } # managed by Certbot

    listen 80 ;
    listen [::]:80 ;
    server_name my-example-domain.com www.my-example-domain.com;
    return 404; # managed by Certbot
}
NGINX has two important folders for domain settings:
/etc/nginx/sites-available
/etc/nginx/sites-enabled
The sites-available folder has the NGINX proxy settings for each individual website. The sites-enabled should
contain symlinks to the files in the sites-available folder. Create a symlink at the command line like this:
$ ln -s /etc/nginx/sites-enabled/my-example-domain.com /etc/nginx/sites-available/my-example-domain.com
Additional Resources:
- https://blog.heckel.xyz/2013/07/01/how-to-use-mitmproxy-to-read-and-modify-https-traffic-of-your-phone/
- https://www.youtube.com/watch?v=iQsKdtjwtYI